
- 1. Registration and CDN Activation Process
- Step 1: Create a Wasabi Account
- Step 2: Create a Bucket
- Step 3: Point a CNAME Record from Cloudflare to the Bucket Endpoint
- Step 4: Purchase a Storage Plan
- 2. Enabling Public Access for the Bucket
- Method 1: Enable Public Access in the Wasabi Console
- Method 2: Add a Public Read Bucket Policy
- Method 3: Combine Public Access and Policy
- 3. Image Uploading Tool for Wasabi
- Wasabi Direct Uploader
- 4. Verifying CDN Functionality
- 5. Important Notes
1. Registration and CDN Activation Process
Wasabi only allows public access and CDN usage after a paid storage plan is purchased. Before that, a CNAME record must be pointed to the bucket endpoint.
Step 1: Create a Wasabi Account
Register an account on Wasabi’s website and access the management console.
Step 2: Create a Bucket
Create a new bucket in the console and choose a suitable region such as Singapore, Tokyo, or Oregon.
Step 3: Point a CNAME Record from Cloudflare to the Bucket Endpoint
Wasabi requires domain verification via CNAME before enabling plan purchase and public access.
Create a CNAME record:
cdn.example.com → s3.ap-southeast-1.wasabisys.comThe record must be set to DNS Only for proper verification.

Step 4: Purchase a Storage Plan
After the domain is verified through CNAME, purchase a storage plan. Once the payment is completed, the bucket becomes eligible for public access.
2. Enabling Public Access for the Bucket
To serve images publicly through the CDN domain, public access must be enabled. There are three methods available; choosing one or combining them is acceptable.
Method 1: Enable Public Access in the Wasabi Console
Go to the bucket’s Settings and disable the following:
- Block Public Access to Buckets and Objects
- Block Public Access to Objects
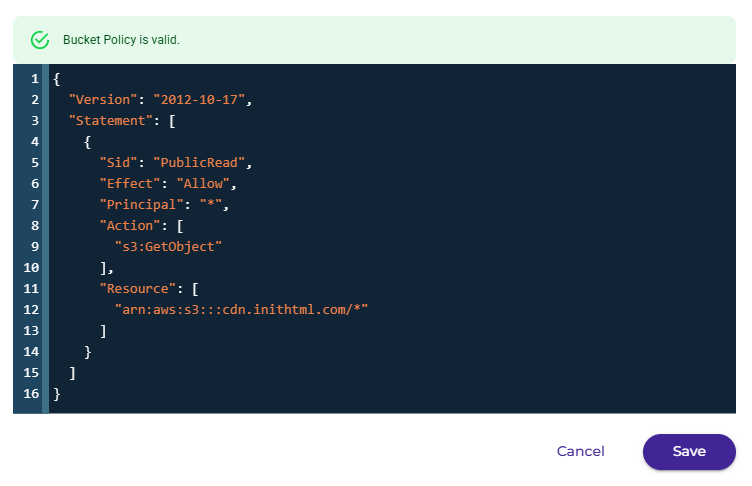
Method 2: Add a Public Read Bucket Policy
Navigate to Permissions → Bucket Policy and add:
{
  "Version": "2012-10-17",
  "Statement": [
    {
      "Sid": "PublicRead",
      "Effect": "Allow",
      "Principal": "*",
      "Action": [
        "s3:GetObject"
      ],
      "Resource": [
        "arn:aws:s3:::YOUR_BUCKET_NAME/*"
      ]
    }
  ]
}
Replace YOUR_BUCKET_NAME with the actual bucket name.
Method 3: Combine Public Access and Policy
This approach minimizes the risk of Access Denied errors.
3. Image Uploading Tool for Wasabi
For websites without a built-in upload system, the Wasabi Direct Uploader tool can be used.
Wasabi Direct Uploader
This tool, developed by Init HTML, provides:
- Direct upload from a local device to Wasabi.
- Automatic generation of URL, HTML <img>, or Markdown format.
- Quick uploading process within one minute.
It is suitable for static websites, custom platforms, or non-WordPress environments.
4. Verifying CDN Functionality
After configuration, test the CDN by opening an image through the CDN domain:
https://cdn.example.com/path/to/image.jpgIf the image loads successfully, the CDN is functioning. If Access Denied appears, recheck public access settings or bucket policy.
5. Important Notes
- Buckets can only be made public after purchasing a Wasabi plan.
- CNAME configuration is required before payment.
- Select a region near the target audience to optimize speed.
- The CDN domain provides cleaner URLs, improved stability, and better SEO.
After completing all steps above, the website will have a stable and cost-effective Wasabi-based image CDN system.


Comments